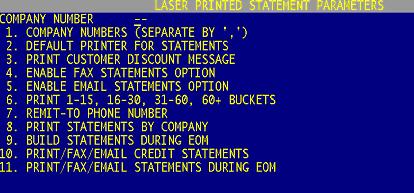
Menu 35.14 - Laser Printed Statement Parameters
LASER STATEMENT - SETUP AND MONTHLY STATEMENT RUN PROCEDURES
IMPORTANT: DO NOT WAIT TILL IT IS CRITICAL ON STATEMENT DAY TO SETUP AND TEST THIS PROGRAM - IT CAN BE RUN AT ANYTIME
If this is the first time you have attempted to run laser statements, please check the following first:
First, make sure Menu 35.14 is setup for each company that will be printing statements separately. If all companies statements will be printed from company 01, for example, only setup this parameter for Co# 01, and include all other company numbers on line 1. Company Numbers.

- Company Numbers - Enter the company numbers that this company prints statements for. If company 01 prints statements for all branches, string all the branches together here (EX: 01,02,03). All of these companies will print on the header of the statement.
- Default Printer for Statements - Enter the printer that the statements should print on. Usually the same one setup in Menu 35.12 as the EOD Invoice printer (field #10) ***This will _NOT_ be printer 0, printer 1 but will be in linux printer queue format EX: inv044_1 (just like the format in M-35.12, field 10)***
- Print Customer Discount Message - Y or N – do you want to print the customer discount message? The customer discount message is a canned message on the system, "You may deduct $0.00 on current balance, only if paid within 10 days."
- Enable Fax Statements Option - Y or N to enable the fax statement option. Must be a Y to have faxes automatically sent when Statements are run.
- Enable Email Statements Option - Y or N to enable the email statements option - Recommend to leave this as an 'N' for now.
- Print 1-15, 16-30, 31-60, 60+ Buckets - Y or N to enable the middle of the month statement buckets.
- Remit-To Phone Number - Y or N to print a remit to phone number ***The remit to address is controlled via Menu -35.12, fields 11 through 14 for both invoices and statements.
- Print Statements By Company - Y or N to print statements by company
- Build Statement During EOM - Enter a Y if you would like your statements to be built automatically duirng the EOM process - recommended.)
- Print/Fax/Email Credit Statements - Y or N to enable sending credit statements.
-
Enter a ‘Y’ in field 11 to have Statements Print/Fax/Email during the EOM process. In order for statements to Print/Fax/Email during the EOM Menu 35.14, Field 9 must also be set to a ‘Y’.
Menu 35.14, Field 11 will default to a blank field which equals ‘N’. If the field is set to ‘N’ statements will not print/fax/email during EOM.
Note: If parameters in Menu 35.14, Field 4 and/or 5 are set to ‘N’ statements will not fax/email, they will print.

|


