Home
Documentation
Regional Training
2009 Training Conference Documentation
Upgrade Documentation
Bulletins
Signature Capture Information
Hand-held Information
UAG Meetings
Hardware
Webstore
Links
Contact


Database System Installation and Maintenance
Documentation

PART I - INSTALLATION

1. Setup Signature Capture Company Parameters                                    Menu 35.12

Go to Menu 35.12 – Signature Capture Company Parameters

Enter Company number at prompt
To setup and enable Signature Capture, fill in all fields by selecting the line number and entering the following:
*Indicates for use with the OLD laser signature capture invoice ONLY.
**Indicates functions differently on the new laser invoice vs. the old laser invoice.
***Indicates for use with the NEW laser signature capture invoice ONLY

  1. Enable Signature Capture - enter 'Y' .
  2. Signature Capture Software Version - If you are unsure of your version number, contact DST.
  3. Signature Capture Server Name - Enter SIGXXX where XXX is your store number (must be 3 digits, Ex: Store 76 would be SIG076).
  4. Signature Capture Fax-Server Name - Same as field 3.
  5. Enable Signature Tablets - Enter 'Y'.
  6. Enable Laser Printed Quotes - Enter 'Y'.
  7. Print Each Price on Laser Invoice - Enter 'Y' if you want each price on the invoice, or enter 'N' if you do not want the each price to print on the invoice.
  8. Print 2nd Copy Only on Cash Tickets - Enter 'Y' if you want to print a 2nd copy (for internal use) for cash, credit card, or check invoices only.  Entering 'N' will print two copies of every invoice.
  9. Print Invoices Every End-Of-Day - Enter 'Y' if you want to print your invoices every night during EOD.  Enter 'N' if you want to customize your printing options using menu 1.20.27.  IMPORTANT:  To keep from having missing invoices, if you select 'N' at this prompt you can ONLY change the fax flag in customer master on the day that your invoices are mailed.  For example;  if you print on Thursday night and mail on Friday you can only change the fax flag in customer master on Friday.
  10. End-Of-Day Invoice Printer - Enter laser printer name where you want the invoices printed either during EOD or using custom option in menu 1.20.27.  Must enter printer name using this format - 'invXXX_1' where - XXX is three digit store number followed by _1, or _2, _3, etc. (Ex. inv044_1)
  11. Remit to Name - Enter the company name here.
  12. Remit to Address 1 - Enter the first address line here.
  13. Remit to Address 2 - Enter the second address line here, if applicable.
  14. Remit to City, Sate, Zip - Enter the remit to city, state and zip code here.  Note:  When the remit to address prints on the bottom of the invoice, it prints on two lines.  We suggest putting * or commas after the company name and each of the address lines to create a nice separation.
  15. Print Store-Transfer Invoices - 'Y' prints a copy of store transfer invoice when batch printing customer invoices.  'N' removes store transfer invoices from the nightly/weekly batch print.  Leaving this field blank will default to "Y".  Either option will still print a copy at time of shipping to use for packing list.
  16. Print 2nd Copy on Credit Memos - Enter 'Y' if you would like a second copy of the credit memo to print.  Enter 'N' if you do not want these to print.  Blank defaults to 'Y'.
  17. Print 2nd Copy on Delivery Tickets - Enter 'Y' if you would like a second copy of the delivery tickets to print.  Enter 'N' if you do not want these to print.  Blank defaults to 'N'.
  18. Print Tax Flag - Enter 'Y' if you would like the tax flag to print on invoices.  Enter 'N' if you do not want the tax flag to print.  Blank defaults to 'N'.
  19. Watermark to Print on Form  1 = YES, 2 = BOLD, 3 = NO
    1 = This optoin was only for the old invoice - do not use for the new invoice.
    2 =
    Will print any of the following in bold: INVOICE, Credit Memo, Packing List, or Cash Invoice.
    3 = 
    Will print either Invoice or Credit Memo ONLY in bold.
  20. Bypass Signature Capture Password - Enter the password to be used in Order Entry when bypassing the need for a signature. It is recommended to use menu 12.1.14 to password protect menu 35.12 and protect this bypass password.  The default password SST will be used, if you leave this field blank.
  21. Fax Cover Page - Company 01 - If 'Y', the fax cover page will be the address, phone and fax from company 01. If 'N' or blank, the fax cover page will be the address, phone and fax for the company of the invoice that is being faxed.

Menu 35.12, Screen 2

  1. Print ‘O’riginal Operator or ‘S’alesman – Enter 'O' if you want the original operator to print on the invoices.  Enter 'S' if you want the salesman name to print on the invoices.
  2. Use Purchasing Fax# For Invoices – Enter 'Y' if you want to use the fax number shown in 12.2.2.2.Field 29 to fax invoices.  Enter 'N' if you want to use the fax number in 12.2.2.2.Field 11 to fax invoices.
  3. Print Time/Date Stamp in 2nd PO Field – Enter 'Y' if you want the time and date stamp to print.  Enter 'N' or leave blank if you do not want this to print.
  4. Print Using Updated Laser Forms – Enter 'Y' if you want to use the NEW laser form for invoicing.  Enter 'N' or leave blank if you want to use the original form.
  5. Print Retail in Each Price Column – Enter 'Y' if you want the retail each price to print on the invoice.  Enter 'N' or leave blank if you don’t want retail price to print.
  6. ByPass Signature on Cash Invoices - Enter a 'Y' if you do not want to require a signature on cash invoices. Enter 'N' or leave blank if you do want to require signatures on cash invoices.
  7. Web Address to Print On New Forms - Enter the web address as you would like it to appear on the new laser invoice form, (i.e., www.johnstoneoc.com) Leave blank to print the default of www.johnstonesupply.com.

If you have multiple companies repeat these steps for each location.  (Note***do not answer yes to 35.12 Field 1 until the signature capture equipment is installed that location)

1a. Setup Scheduled EOD's to print Invoices                                           Menu 1.20.27
This only needs to be completed if you answered 'N'o in field #9 (Print Invoices Every End-of-Day) in menu 35.12 above. And needs to be completed only once for all stores setup this way.

In menu 35.12 Field 9, users have the option of selecting ‘N’ so invoices do not print at the end of each day. When selecting ‘N’ in 35.12 you need to go into Menu 1.20.27 and tell the system which days the invoices need to print.

Menu 1.20.27

When entering the invoice dates it’s important to clarify that with the first running, the first date entered must be before the day you need the invoices to print. For instance if you want your invoices to print on July 28th, and you have never used the program before, the first date that you would want to enter would be July 26th. Otherwise the system keeps looking back indefinitely. It needs a benchmark. With this example, on the 28th it would print the invoices from July 26th – 28th.

It’s also important to remember that you will need to enter a month end date that you want the invoices to print on. The invoices will not automatically print at the end of the month. A date must be entered in 1.20.27.

It is recommended to input several dates at a time, like one or two months worth,  to limit the possibility of forgetting to input a date, therefore not having your invoices printed when you expect to. 

Tip – set yourself a reminder in your email program to update these dates on a monthly basis.

2. Setup Signature Capture Port Parameters                                              Menu 35.13

You will need to set up this screen for every port (PC or Terminal) in your organization (examples below).  If you do not know your port numbers they can be found in Menu 12.10 Port Control or by looking in the upper right corner of the screen at the Main Menu.

Go to menu 35.13 Signature Capture Port Parameters

Enter port number
Fill in all fields as follows:

  1. SIGNATURE CAPTURE PAD ATTACHED (Y/N) – Enter ‘Y’ if a pad is attached to this terminal otherwise enter ‘N’ (This field determines whether the PC is going to prompt for a signature or not.)
  2. SIGNATURE CAPTURE PAD TYPE ('L'CD, 'N'ONE) – Enter ‘L’ if the port has a LCD pad attached or ‘N’ if it does not have a LCD pad.
  3. ORDER ENTRY PRINTER ('L'ASER, 'P'LAIN, 'A'LL-MULTI) – Enter ‘L’ if the customer invoice/packslip should print on the Laser printer, or enter ‘A’ to default to the printer in port control in Menu 12.10. Enter ‘P’ if you would like to print to a dot matrix printer using plain white paper (this would be used in an emergency if a laser printer broke or did not work).
  4. LASER PRINTER DEFINITION (EX. inv044_1) – enter laser printer name – must be in format ‘invXXX_1’ where XXX is the store number (Ex:  Store 76 = 076)
  5. BRANCH NUMBER THAT PORT IS MAPPED TO – Enter the branch number where the port is located.  Single digit branch numbers must be entered as a 2 digit number.  2 or 3 digit branch numbers are entered like normal.  (Ex:  Branch 4 – enter ‘04”, Branch 76 – enter ‘76’, Branch 155 – enter ‘155’)
  6. PRINT  BAR CODE ON INVOICE (Y/N) – Enter Y if you would like a barcode to be printed on the packlist and invoice (you would want this if you are using a handheld for deliveries).  Enter N if you do not need barcodes to print on the packlist/invoice.

Examples:  
--Typical PC at counter with LCD pad attached
1. Y
2. L
3. L
4. INV155_1
5. 155
--Typical Shipping terminal (PC) that prints to 3 part invoice
1. N
2. N
3. A
2. INV155_1
3. 155
--Typical dumb terminal With no pad attached
1. N
2. N
3. A
4. INV155_1
4. 155
-- Typical PC with no pad attached
1. N
2. N
3. L
4. INV155_1
5. 155

3. Set up Laser forms default                                                                          Menu 1.20.7

The message specified here will print on the bottom of every laser invoice.
Message lines 1 & 2 will print in bold print, lines 3-5 will be regular.

Go to Menu 1.20.7

Select the first message line and enter the message you want to appear on the invoice.  Continue through lines 2, 3, 4,& 5 by selecting the line and then entering your message. If you do not want a message in one of the lines enter ‘*’ to clear the line.
When finished, type ‘0’ to accept.

4. Set up store defaults for laser invoices                                                   Menu 12.1.1

Go to Menu 12.1.1

Select your company number – Ex:  01 or 02
Verify fields 1, thru 7 and 15 are filled in and accurate.  These will print on the top of every invoice for this company.
Repeat for each company if you have multiple locations.

5. Set up email defaults                                                                                  Menu 1.20.21

Go to menu 1.20.21


1 STORE.FROM.EMAIL.ADDR: Enter the email address that you want the email containing the invoices/statements, to be coming from.
Note:  the system will modify your address after it is entered.
2. DEFAULT SUBJECT LINE: Enter the desired subject line for Invoice emails (i.e., "Invoices attached are from Johnstone Supply")
3. DEFAULT MESSAGE LINE: Please change line #3 to say "Here are the Invoices that you requested. Adobe Acrobat 5.0 or higher is required to view the attachment(s)"
4 UNIX CONTROL DIRECTORY: Enter /home/johnstone/data/adhoc unless directed otherwise.
5. USE MASTER A/R EMAIL ADDR:  Enter 'N' if you would like the customers invoices/statements to get emailed to the email address listed in Menu 12.2.2.2, Field 17.  Enter 'Y' if you prefer to have the invoices/statements emailed to the address listed in the Master A/R account.  Type ‘0’ to accept changes.

6. Set up Paperless EOD Report ‘List of Invoice Signatures’                    Menu 16.5
Go to Menu 16.5
Enter ’XX-167’ – where XX is your company number (ie; 01-167, 02-167 etc.)
Fill in desired fields with necessary information.  (See Paperless EOD Procedures for more detailed information)

This report shows you all of the invoices that were finalized the previous day and whether they have an OK, Missing or Unreadable signature on them. This report should be looked at daily to ensure that the necessary signatures are being captured.  If signatures are listed as missing or unreadable the invoice should be researched. Because we are not able to collect signatures on every invoice yet, it also gives you the ship method, the port number it was finalized on, the total dollar amount and the operator who finalized it - in case you have questions - to help determine whether a signature was required or not. See a sample of the report below:

7. Set up ‘List of Laser Printed Invoices’ paperless EOD Report              Menu 16.5
Go to Menu 16.5
Enter ‘XX-168’ - where XX is your company number (ie; 01-168, 02-168 etc.)
Fill in desired fields with necessary information.  (See Paperless EOD Procedures for more detailed information)

This report is intended for you to confirm that all of your laser invoices to be mailed (customers who are not on the Fax or Email program) have printed. This report will print with End-of-Day the same day that your laser invoices print. If you print your laser invoices daily, you will receive this report daily. If you print your invoices weekly, you will receive this report weekly. The report is printed in alpha order by customer name, the same order as your invoices printing on the printer. See example of this report below:


8. Setup Phone Exchange Maintenance                                          Menu 1.20.8/1.20.9
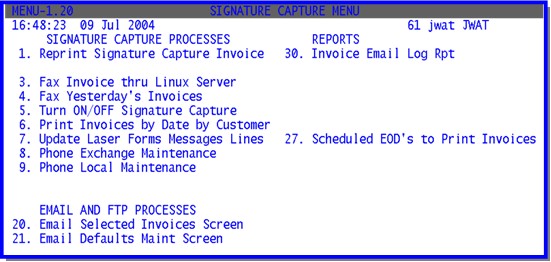
Faxing invoices to customers through EOD processing – using a local fax server (Linux server). 

Due to various long distance dialing issues, DST has created two different options to help configure your systems long distance dialing requirements.  These programs will tell your computer when a ‘1’ is needed in order to dial a long distance number.  Either option must be implemented with the help of DST.  Please start this process by determining which of the following options best suits your needs, gather the necessary information in a spreadsheet and then contact DST. 
***Note – if you do not set this up your system may not fax correctly. **

Typical format for phone number is XXX-XXX-XXXX.  The area code is the first three digits and the exchange is the next three digits.   (area-exchange-XXXX)
 
Currently the base system determines whether a ‘1’ is necessary by looking first at menu 12.2.2.2 field 29, and then to field 11.  If in 12.2.2.2 field 29, or field 11 you have a 10-diget number the system will add a ‘1’ before dialing.  If it finds a 7-diget number in Field 29 or field 11, it will not add a ‘1’ when dialing.  For multiple store users, you must consider the dialing requirements from the location that the fax server is located.  Please gather the exchange information on a spreadsheet with two columns labeled area code and exchange.  DST will set up the initial installation - then it will be up to each store to maintain.

Option A – Menu 1.20.8 – Phone Exchange – Use this option if you want to enter the exchanges in your area that require a ‘1’ when dialing long distance.

Option B – Menu 1.20.9 – Phone Local Maintenance – Use this option if you want to enter the exchanges in your area that do not require a ‘1’ when dialing long distance, or if your area requires 10-digit dialing.

9. Setup fax or e-mail invoices for customers                                         Menu 12.2.2.2

The customer now has a choice to receive their copy of the invoice via snail mail, e-mail, fax, or not at all. All choices are outlined below. 
Use 
Menu 12.2.2.2, Screen1, Field 31 to select the fax indicator for each customer. 
If you are faxing the invoices to your customer go to Menu 12.2.2.2, Screen1, Field 11 and enter the fax number you want to send the invoices to.  Only fill in the area code if it is long distance to dial it from the location of the Linux server. 
If you are emailing the invoices to your customer, go to Menu 12.2.2.2, Screen1, Field 17 and enter the email address you would like the emailed invoices to be sent to.  On the base package the invoices can only be faxed or emailed to one number or address.
Note:  Any of the options that include faxing statements will only work if using Xpedite.  DBS (non Xpedite) functionality projected for 3rd quarter 2004. 
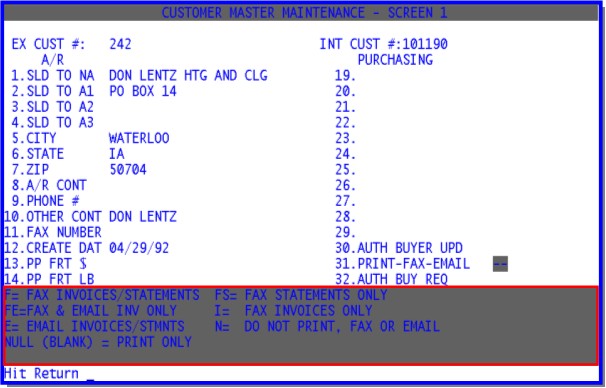
Field 31. PRINT-FAX-EMAIL Options:
Leave Blank – The customer invoices will print daily during EOD and Statements will print at EOM. Note: To blank out the field if there is already something there, enter a * (shift+8) in the field.
E – Email Invoices & Statements.  Adobe Acrobat 5.0 or higher is required for the customer to view the attached invoices. This will email the customer their invoices daily during EOD and print statements during EOM.*
F – Fax Invoices & Statements.  This will fax the customer their invoices daily during EOD and their statements monthly (if using Xpedite)
FE – Fax and Email Invoices Only.  Adobe Acrobat 5.0 or higher is required for the customer to view the attached invoices. This will fax the customer their invoices daily during EOD and also send a duplicate email to the customer daily during EOD. Note: This could be used if you want to send the fax to one person and the email to another.
FS – Fax Statements Only.  This will fax statements to the customer during EOM processing. Invoices will be printed and mailed.
I – Fax invoices only.  This will fax invoices to the customer daily during EOD processing. Statements will be printed and mailed at EOM.
N – Do Not Print, Fax, or Email.  This will remove customer from any printed, faxed or emailed invoices. Statements will still be printed and mailed at EOM.

See chart below for additional clarification:
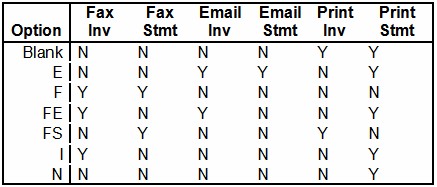
*Functionality to email statements is projected for 4th quarter 2004.

PART II - MAINTENANCE AND OTHER FUNCTIONALITY

Signature Capture Account Update Letter                                                                         

A lot of you may want to send a letter to your customers letting them know about your new email and fax capabilities. Here is a sample letter that Santa Ana sent to their customers - this is a great example.

Menu 1                                                                                         Order Entry and Invoicing

Menu 1.3 Maintain POs on Finalized Invoices

This menu is not new, but it does have some new functionality. When you maintain a PO using this menu, it will now ask you if you want to reprint the invoice, if you select 'Y'es, it will print on the default laser invoice printer for that port. This is for your customer if he/she needs a copy with the PO number printed on it.

Menu 1.31 Reprint Signature Capture Invoice

To use this menu, enter the release number(s) separated by a semicolon (;) and press <enter>. The program will determine whether it is a signature capture invoice or the old style invoice and print it on a printer accordingly. Either the default laser invoice printer for that port or the default report printer as a plain paper invoice.

  Invoice/Credit Memo Reprint

Enter Release Number(s) (11N), separate multiples with ;' :01123456001;01123454001

Menu 1.32 Fax Invoice with Signature Capture

Use this menu to fax an invoice to your customer. Only one invoice can be faxed at a time through this menu.

Program to fax invoices from Server

Enter release number (11N) ?01084077001

Enter fax# or <enter> for 904-358-0975 ?
request id is 6795 (group id 6795) for host localhost (1 file)

press <enter> ?


Enter the release number that you want to fax.
Enter the fax number or press <enter> to use the default that is displayed on the screen.
When you are prompted to press <enter> again, your fax is complete.

Menu 1.33 Email Selected Invoices Screen
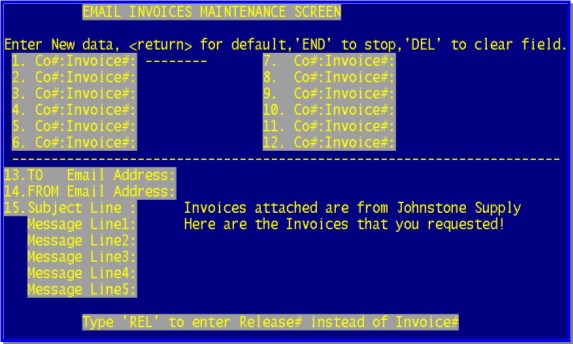
Use this menu to email Signature Capture invoices. You can send up to 12 invoices in one email.
Enter the company number then invoice number (ie; 01123456) in line 1.  If you have a release number and not the invoice number, type REL to enter the release number instead. To enter multiple invoice numbers, continue to enter invoice numbers in the consecutive fields.
When you have entered all the invoice numbers, press <enter> and you will be taken to line 13. The TO email address field. This field is automatically filled in with the email address that is on file for the customer whose invoice number is in line 1, if there is an address on file. To accept the default address, press <Enter> again, or else enter the email address you would like to send the invoices to and press <Enter>.
Next you will be at line 14. the FROM address field. This field is automatically filled in based on what was setup in menu 1.20.21. To accept this default, press <Enter> otherwise, enter the email address you want the invoices to come from and press <Enter>.
The next prompt is the Subject Line, this information is also filled in with the default that was setup in menu 1.20.21, to accept the default, press <Enter>, otherwise enter the desired subject and press <Enter>
Again, the Message Line(s) is/are filled in automatically with the default that was specified in menu 1.20.21. Press <Enter> to accept the default or enter the desired Message text.
Once you have all of the information filled out, press 0 <enter> to accept and your  invoice(s) will be emailed and the FROM email address will receive an email confirmation that the invoices have been sent.

Menu 1.20                                                                                      Signature Capture Menu

Menu 1.20.4 Fax Yesterday's Invoices


Menu 1.20.5 Turn ON/OFF Signature Capture


Menu 1.20.6 Print Invoices by Date by Customer

Will print Non-cash Signature Capture Invoices, for a date range, for either a select customer or ALL customers.  This report will only be able to print invoices back as far as your live release file allows, (m-28.0.1 #6- Release.Hist). This will take several minutes to run. 
 

Menu 1.20.31                                                               EOD Fax Log Update & Report

On Demand Fax Report Menu 1.20.31.  This report can be configured to show a log of all EOD faxes, EOD problem faxes, or EOD resend problem faxes for a given date or date range.


Begin by going to Menu 1.20.31.  Select the printer to print the report to.  Even if you are resending problem faxes, you will still need to select a printer (nothing will print).  The system will then take a moment to update the information.  (See the above figures)

Enter the report beginning date.
Enter the report ending date.
Enter the customer number or "Enter" for All customers.

Select the report option:

1.  Report on all EOD faxes
2.  Report list only problem EOD faxes
3.  Resend EOD problem faxes

Note:  It is a good habit to print 1.20.31, Report 2 on a daily basis.  If there are items appearing, run option 3 to resend the faxes.  After resending the problem faxes, re-run option 2. This report should be blank.


Menu 1.20.32                                                               Manual Fax Log Update & Report

On Demand Fax Report Menu 1.20.32.  This report can be configured to show a log of all Manual faxes, Manual problem faxes, or Manual resend problem faxes for a given date or date range.

Begin by going to Menu 1.20.32.  Select the printer to print the report to.  Even if you are resending problem faxes, you will still need to select a printer (nothing will print).  The system will then take a moment to update the information.  (See the above figures)

Enter the report beginning date.
Enter the report ending date.
Enter the customer number or "Enter" for All customers.

Select the report option:

1.  Report on all Manual faxes
2.  Report list only problem Manual faxes
3.  Resend Manual problem faxes

Note:  It is a good habit to print 1.20.32, Report 2 on a daily basis.  If there are items appearing, run option 3 to resend the faxes.  After resending the problem faxes, re-run option 2.  This report should be blank.


                                              <--- Previous                Next --->
                         Hardware Documentation               PC Software Documentation

© 2003 DST - All rights reserved.  Enter your Support Job Here

You could be using SiteMax too! Click Here for details.