|
U2004.4 Upgrade Documentation
 Click here for a printer friendly version: U2004.4 Upgrade Documentation Click here for a printer friendly version: U2004.4 Upgrade Documentation
Menu 1 Order Entry & Invoicing
Menu 1.20.21.Field 5 - Use Master A/R Email Address
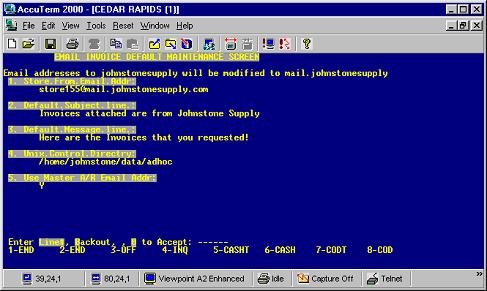
Figure A
Note - Signature Capture must be installed in order to receive this feature update.
To select which email address your customer's invoice/statement will be emailed to during the End of Day go to menu 1.20.21.
Select line 5 (See Figure A) and enter N if you would like the customers invoices/statements to be emailed to the email address listed in field 17 of 12.2.2.2 (Cust mast). Enter 'Y' if you prefer to have the invoices/statements emailed to the address listed in the Master A/R account.
Menu 1.20.32 - Manual Fax Log Update & Report
On Demand Fax Report Menu 1.20.32. This report can be configured to show a log of all faxes, problem faxes, or resend problem faxes for a given date or date range.
Note - Signature Capture must be installed in order to receive this feature update.
Figure B
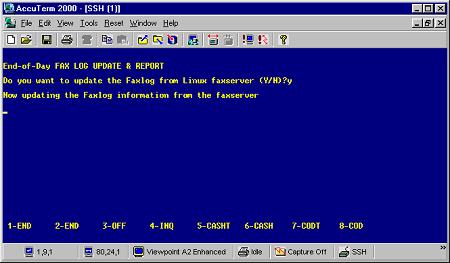
Figure C
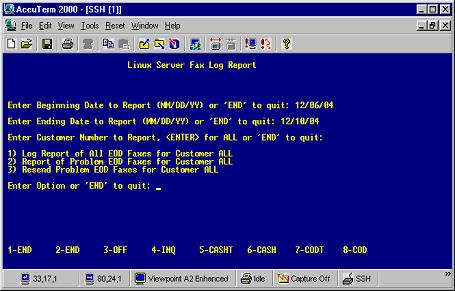
Begin by going to Menu 1.20.32. Select the printer to print the report to. Even if you are resending problem faxes, you will still need to select a printer (nothing will print). The system will then take a moment to update the information. (See Figure B & C)
Enter the report beginning date.
Enter the report ending date.
Enter the customer number or "Enter" for All customers.
Select the report option.
1. Report on all end-of-day faxes
2. Report list only problem end-of-day faxes
3. Resend problem faxes
Note: It is a good habit to print 1.20.32.Report 2 on a daily basis. If there are items appearing, run option 3 to resend the faxes. After resending the problem faxes, re-run option 2. This report should be blank.
Menu 3 Accounting Registers
Menu 3.6 Weekly Commission Report
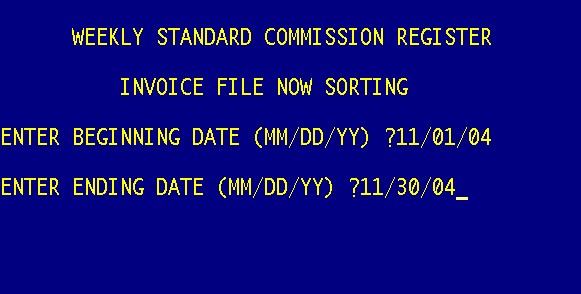
Prompts for beginning and ending dates have been added to the Weekly Commission Report. This report can now be run for any length of time, not just for a single week. (See Figure D)
Figure D
Menu 4 Accounts Receivable
Menu 4.1.9 - Credit Manager Inquiry
You are now able to email invoices to customers from menu 4.1.9 (See Figure E)
Note - Signature Capture must be installed in order to receive this feature update.
Once this prompt appears:
Enter Previous, Invoice, or Press <Enter> for aging buckets:
Select 'I' for Invoice. The Email option then appears at the bottom of the screen.
Figure E
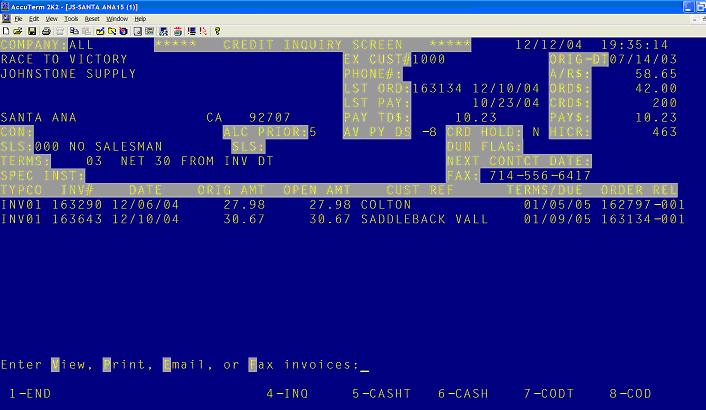
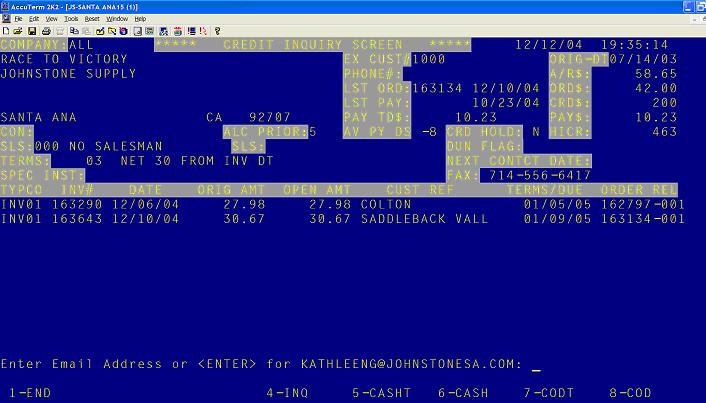
The system defaults to the email address on the customer master (Menu 12.2.2.2 Field 17) or, you can enter a different email address. (See Figure F)
Figure F
Menu 5 Price Maintenance
Menu 5.33 New Customer Pricing Matrix
PVCTG - The following features have been added if you enter 'P' to setup pricing or discounts for a specific product.
- Can use L for lookup
- .<enter> for the next part number in sequence
- .### for the same prefix
- P roduct option will display buckets at the bottom and discounted price, branch and direct cost.
Note: Further details about Customer Pricing can be found at http://dst.sitemax.com/M5-33.asp
Menu 7 Purchasing
Menu 7.1 - Purchase Order Entry & Edit
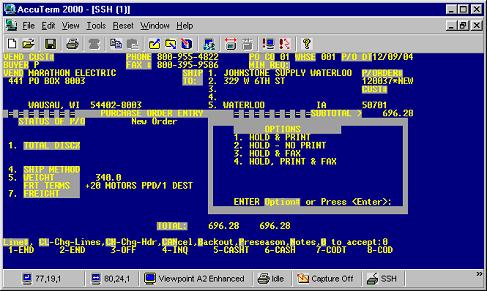
A purchase order can now be faxed directly from the final screen in Menu 7.1.
(Note: Monolith Desqfax system is required for this to work.)
Select option 3 to Hold and Fax the PO, or select option 4 to Hold, Print and Fax the PO. (See Figure G)
Figure G
Menu 9 Physical Inventory Procedures
Menu 9. 2. Freeze Onhand/Spool P.I. Tags
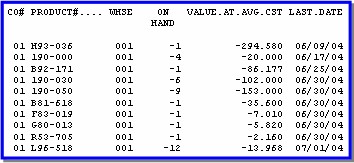
The system will not allow you to run Menu 9.2 if there are items with negative onhand quantities. When Menu 9.2 is selected, and there are items with negative onhand quantities, a negative onhand report will run automatically. It will be required that any negative onhand amounts are adjusted thru menu 8.4 before continuing. Once all negative onhand quantities are adjusted and none remain, run Menu 9.2 to freeze on hand quantities. (See Figure H)
Figure H
Menu 9.20.22 - Products with No WARE.LOC
This report lists all items in the warehouse with quantity on hand, but without a warehouse location assigned in the product detail. To assign a warehouse location use Menu 12.3.2.3 Fields 8-11.
Menu 12 File Maintenance
Menu 12.1.17 - Sharepoint Port Maintenance
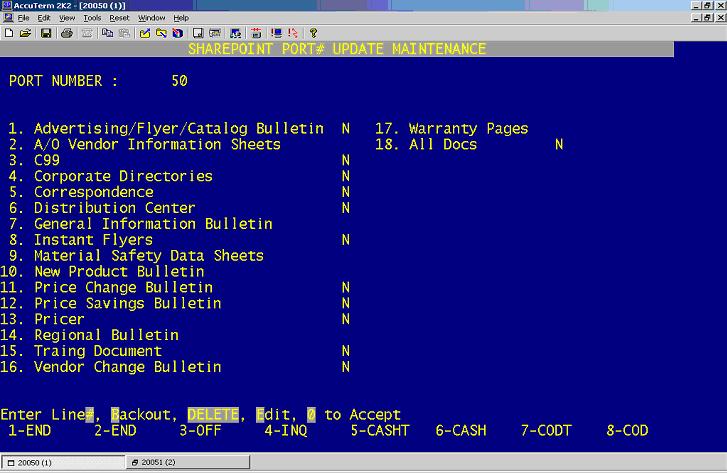
To control which Sharepoint (SP from the Stock Status screen, Menu 19.6) document options will be displayed on a given port go to Menu 12.1.17 (See Figure I). This is viewed by typing SP from the stock status screen (must have a product on the screen).
- Enter the port number that you want to change
- Enter 'N' on the document line(s) that you do not want displayed in stock status
Figure I
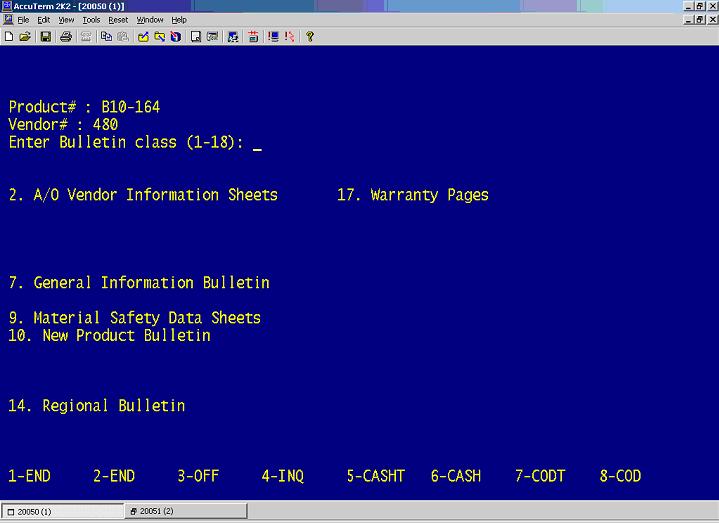
To test, from the selected port enter any part # in the stock status screen (Menu 19.6) type SP, the only document options that will be displayed are the lines which were left blank. (See Figure J)
Figure J
Menu 13 Accounts Payable
Menu 13.2.8 - Bank Activity Report
The bank activity report can now be run for 12 months of past activity.
Menu 13.3.3 - A/P Check Register & Paid Invoice Register
The monthly check register can now be transferred to your C drive, by entering FT at the printer prompt.
Menu 13.5 - Vendor Payables Inquiry
Two new fields have been added (See Figure K): PO number and the date on the Receiver (if using 13.20.2).
Figure K
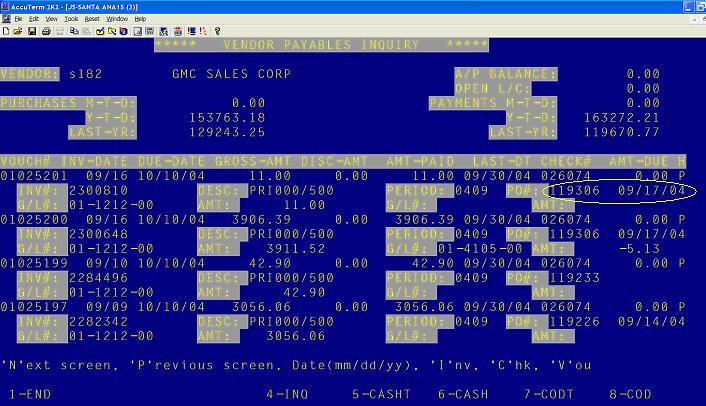
Also, when using the I option to search by invoice, you can enter one invoice after another without having to re-enter the vendor each time.
Menu 13.20.1 & 13.20.2 - AP Voucher Input & Purchase Order Receipts Update to A/P
A change has been made to the batch entry screens for menus 13.20.1 and 13.20.2 so that the period field will only accept periods that have not been closed.
Menu 13.20.2 - Purchase Order Receipts Update to A/P
When vouchering merchandise in menu 13.20.2, you will no longer be blocked from vouchering with the message "No open PO receipts" if a receiver is not on record for the entered vendor. Instead, you will be allowed to manually enter a receiver to code to the vendor.
Menu 14 General Ledger
Menu 14.1 - Journal Entries
You cannot close a GL period if there are still Journal Entries pending for that period that have not been updated. To update use Menu 14.1.13 or 14.1.14.
Menu 17 End of Month
Two new reports have been added to the end of month job stream: Open Warranty Report and Unclaimed Warranty Report. These reports have been tagged as 01-183 and 01-184 and their EOM printing can be controlled through Month-End 5.
Menu 19 Inquiries
Menu 19.1 - Customer Orders Not Purged
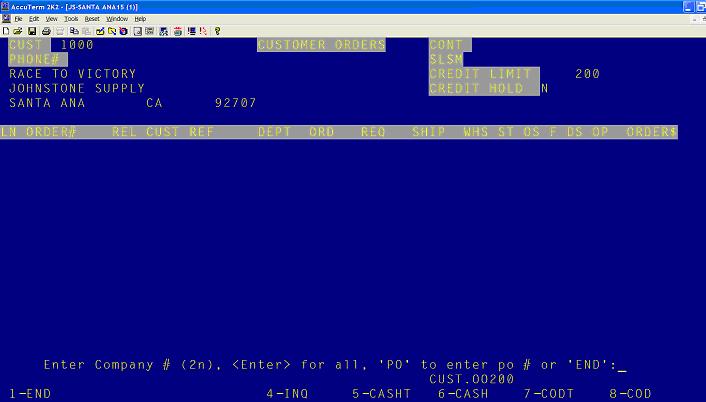
An additional prompt in 19.1 allows for searching through customer orders by the PO number. You dont need to know the full PO #; you can search using the first few characters. (See Figure L)
Figure L
Menu 19.6 Stock Status
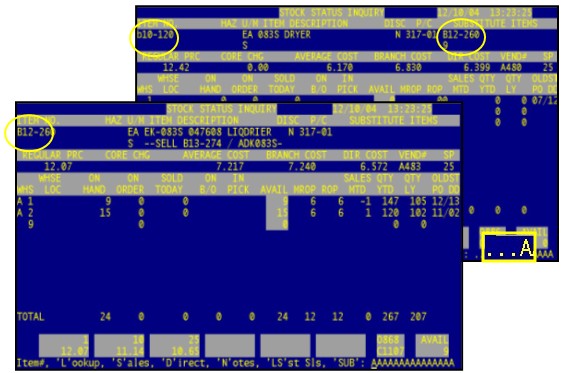
When an item you've pulled up in stock status has a substitute part number listed, you may now type '...' (Without the quotation marks) to display the substitute part number in stock status. (See Figure M)
Figure M
Advanced Part Number Lookup in Stock Status
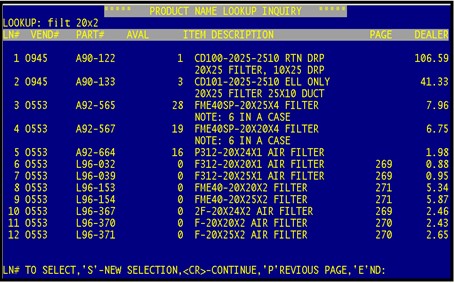
Some part number lookups can return a lot of results. To remedy this, you may now do an advanced lookup.
To do an advanced lookup enter your initial 4, 5 or 6 lookup characters, followed by a space, then 4, 5 or 6 additional lookup characters.
For Example if you want to find a 20x20x1 Filter, you can type 'FILT 20X2' and you will get only results with both Filter and 20x2 in the part number and/or description. (See Figure N)
Figure N
Menu 27 PO Forecasting Menu
Menu 27.4 - Report Forecast
The forecast report also shows the direct cost and quantity for cataloged items. (See Figure O)
Figure O

Menu 27.5 - Maintain Forecast
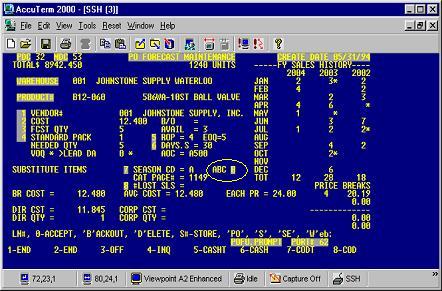
ABC Ranking will now be displayed on the PO Forecast Screen Menu 27.5. See middle of screen to the left of Dec. (See Figure P)
Figure P
Menu 35 Parameter Menu
Menu 35.9 - Order Entry Check Open Orders
To set parameter 35.9, Field 1 to Y or N for all customers, type DEFAULT in the customer field. Then select Y to check for open orders in Menu 1.2, or select N to not check for open orders in Menu 1.2.
Customers who need to be setup differently then the default setting can be setup individually in Menu 35.9.
Menu 35.11 & EOY - Clear & Calc Preseason Forecast
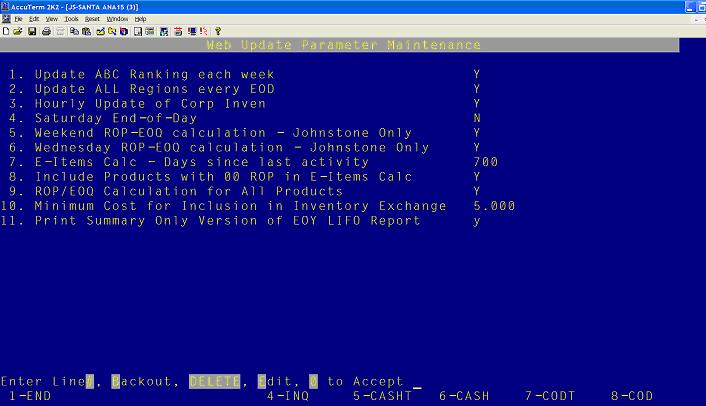
Instead of printing a full LIFO report, you can now print the totals by warehouse. This is controlled through, Menu 35.11, field #11. (See Figure Q)
Figure Q
Menu 35.12 - Signature Capture Company Parameters
New Signature Capture company parameters where added. (See Figure R)
Menu 35.12.Screen 2 Reminder: When in Menu 35 you can enter a ? and it will link you to the on-line documentation.
Figure R
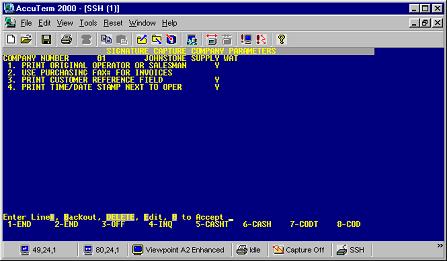
1. Enter 'Y' if you would like the original operator or salesman to print on the invoice. Enter 'N' if you would like the last operator to appear on the invoice.
2. Enter 'Y' if you would like to use the fax # in 12.2.2.2 Field 29 for faxing invoices/statements. Enter 'N' if you would like to use the fax # in 12.2.2.2 Field 11 for faxing invoices/statements.
The following fields were changed in a later upgrade and are no longer valid - Click on the link above to see complete up-to-date documentation of Menu 35.12.
3. Enter 'Y' if you would like both the customer reference field and the customer PO to print on the invoice. Enter 'N' if you would like the PO Field only to print on the invoices.
4. Enter 'Y' if you would like the time/date stamp to print next to the operator on the invoice. Enter 'N' if you do not want this option.
Menu 35.19.7 New Event Notification Option
Cancelled Invoices/Pick Packs
Enter the company number that the event will take place in.
Menu 35.19.7
· Fields 1 - 9 Email Address - select lines 1-9 and enter the email address of the people you want notified when a invoice or pick pack is cancelled in Order Entry.
· Field 10 INVOICES ONLY - enter 'Y' if you want to receive notification only when invoices are cancelled. Enter 'N' if you want to receive notification when either an invoice or a pick pack has been cancelled.
|


