U2004.3 UPGRADE DOCUMENTATION
 Printer Friendly Version (Adobe Acrobat Required) Printer Friendly Version (Adobe Acrobat Required)
Menu 1 Order Entry and Invoicing
Menu 1.2 Order Entry
Enhancements to and complete documentation on taking deposits on customer invoice
- In Order Entry, enter customers account number, cash or charge it does not matter.
- Enter the products that are to be prepaid as well as any items that are being picked up at this time.
- Make sure all freight charges are included at this time; whether it's freight in or out or both.
- Backorder all products that are being prepaid
- Charge the customer the full dollars ordered amount not the dollars shipped.
- Enter cash received in line 20 as the full ordered dollar amount.
- Change the "change given" on line 22 to $0.00.
- Finalize the invoice. It will prompt that "Cash received does not match invoice" Enter Y.
Important: This invoice may not be altered in any way once it is finalized. Items may not be added or removed from the invoice. If a customer wants to cancel the order, you must finalize the invoice as it is and then do a credit.
It is recommended to "ship complete" all prepaid (deposit) orders on the second release. Try not to let the customer pick up 1 item on the second release, then another on a third, etc. When releasing the backordered, prepaid items, you must not enter any cash received or change given for each release that is finalized.
Enhancements to the deposit process include: The 2nd release will not be allowed to be created before the 1st release has gone through day end. And when doing a credit, it will not pay out deposits.
Menu 1.20.31 Linux Fax Log Update & Report
This report will give you a few different options, but the main idea is to find out which faxes did not go through to the customer on a given night. This report will replace any previous Excel report.
When you run the menu path, it will first update the record - that may take a few seconds - then you will receive the following prompts
Enter Beginning Date to Report (MM/DD/YY) or 'END' to quit:
Enter Ending Date to Report (MM/DD/YY) or 'END' to quit:
Enter Customer Number to Report, <ENTER> for ALL or 'END' to quit:
1) Log Report of All Faxes for Customer
2) Report of Problem Faxes for Customer
3) Resend Problem Faxes for Customer
You can enter a beginning date as far back as the beginning of the current month and an ending date as early as the current date.
The customer number prompt is optional. If you are analyzing a customer who is claiming they are having a problem receiving their faxes and you only want to look for that customer's faxes, you can put in just their customer number.
The last three options are broken down below:
1) This will list all faxes - sent and unsent - for one particular customer or all depending on how you answered the enter customer number prompt.
2) This will list just the unsent or problem faxes for one particular customer or all depending on how you answered the enter customer number prompt.
3) This will automatically try to resend all of the unsent or problem faxes for the specified period of time for one particular customer or all depending on how you answered the enter customer number prompt.
Menu 4 Accounts Receivable
Menu 4.1.9 AR Inquiry
The option to Fax signature capture invoices from this menu has been added. After you input the customer number, you will get the following prompt:
Enter Previous, Invoice, or Press <Enter> for aging buckets:
Press 'I' for Invoice and you will get this prompt:
Enter View, Print, or Fax invoices:
Press 'F' for fax and you will be prompted for the 8-digit invoice number (ie, 01123456). You may enter multiple invoice numbers separated by a semi-colon (;). The program will look at the first invoice number entered to determine whether a signature capture invoice can be faxed thru the Linux server or not. If so, it will attempt to fax all of the invoices thru the Linux server, and it will alert you of any invoices that were not able to be faxed that way. If the first invoice is too old to be faxed with a signature, it will use Desqserver to fax all of the invoices.
You may also select 'P' to print the invoices; it will prompt for the 8-digit invoice number and will automatically print on your default laser invoice printer.
Menu 5 Price Maintenance/Price Books
FOR THE MOST UP-TO-DATE document for Updating Costs/Prices from a spreadsheet follow this link: http://dstdocs.sitemax.com/pricing_5_9.asp
Menu 5.9 - Auto Update Costs/Prices from a Spreadsheet
This program allows you to change or create pricing from a spreadsheet (file or program pricing). This program is VERY specific from the way the spreadsheet is created to where it is saved on the computer. Here are the specifics to use when creating this spreadsheet:
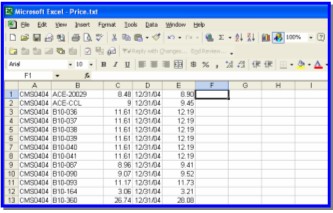
Use Excel to create the file, taking care that the following information is in the specified columns. Do NOT include column headings or extra notes.
Column A = Program name (or type 'NONE' (without quotes) in cell A1 if not updating a program)
Column B = Product number (Johnstone Stock Number or vendor part number*)
Column C = Program price (no $) (leave this column blank if not updating program price)
Column D = Expiration date (Must be in the MM/DD/YY format. Leave this column blank if not updating a program.)
Column E = Each price (no $) (Leave this column blank if not updating each price.)
Column F = Retail (no $) (Leave this column blank if not updating retail price)
Column G = Direct cost (no $) (Leave this column blank if not updating direct cost)
Column H = Direct Quantity (If left blank it will not change any direct qtys already existing.)
Column I = Branch Cost (Leave this column blank if not updating branch cost.)
Column J = Program qty break price (Leave this column blank if not updating a program.)
Column K = Program qty break( Leave this column blank if not updating a program.)
*Must match exactly what is in Product Master field #4, vendor description.
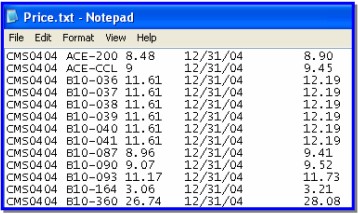
Save the file in the C:/pick directory and name it "price.txt" which is a tab delimited file-not an excel file. Make sure you close the spreadsheet before running the program.
Suggestion: You may want to begin blocking the Corp. updates for direct cost, etc... using Menu 12.3.2.9
This program MUST be run from the computer with the 'price.txt' file saved on it or it will not work.
Example of the file in Excel, where it is created:
Example of the file as a text document, after it is saved:
Menu 5.33 – New Customer Pricing Matrix
This menu will eventually replace menu 5.3 and will allow many, many, more options. Because of the wide variety of options it is difficult to explain without running some tests in your stores. We will first explain how the system currently works for customer discounts and pricing, and then explain how the new system works. After that we will list all of the options available when entering your information and follow that up with some examples.
Current system Hierarchy:
1. Individual contracts entered in 5.2 – if finds something uses this price, if not moves on to …
2. Program contracts entered in 5.2 – if finds something uses this price, if not moves on to …
3. Searches 5.3 in order by row and finds the first occurrence of the item and then uses that scenario. This price is then compared to the buckets shown in stock status and the lower of the two is displayed. **Note – it is possible to rearrange rows in 5.3 to alter which price is selected.
New system - Hierarchy for customer pricing Menu 5.33
1. Individual contracts entered in 5.2 – if finds something uses this price, if not moves on to …
2. Program contracts entered in 5.2 – if finds something uses this price, if not moves on to …
3. Searches all of 5.33 to find the absolute lowest price and uses that scenario. If nothing is entered in 5.33 then it goes back to old menu 5.3 hierarchy (as explained above). **Note – Future plans include discontinuing menu 5.3. (It will be replaced by 5.33)
When in OE the buckets that are displayed are based on the above sequence of events. On the OE screen on the lower left hand side you may see a small bucket with a code in it such as C1, C2, P1, or P2. This code is for development use and tells the programmers where the bucket pricing came from. The following is for reference for the codes:
C1 – Customer, Product P1 – Program, Product
C2 – Customer, Category P2 – Program, Category
C3 – Customer, Class P3 – Program, Class
C4 – Customer, Type P4 – Program, Type
C5 – Customer, Vendor P5 – Program, Vendor
To use Menu 5.33.
C/P – Enter a ‘C’ for customer or a ‘P’ for program.
Option ‘C’ – After entering a ‘C’ you will be prompted for the customer code. Enter the customer code
Option ‘P’ – After entering a ‘P’ you will be prompted to enter the program name. Enter a name you have selected for this program. Each program can have multiple products in it and will only be effective if the name of the program is listed in Customer Contract Number Maintenance found in menu 12.2.2.2 screen 1 menu 7. (Similar to contracts in Menu 5.2)
PVCTG – Enter one of the following depending on what you are trying to do
P – Enter ‘P’ if you are setting pricing or discounts for a specific product. Then enter the specific product number you are setting up. (Can use ‘L’ for lookup)
V – Enter ‘V’ if you are setting pricing or discounts for a specific vendor. Then enter the specific vendor you are trying to set up. (Can use ‘V’ for lookup)
C – Enter ‘C’ if you are setting pricing or discounts for a product class. Product classes can be found in Menu 12.3.24. Then enter the product class you are setting up.
T – Enter ‘T’ if you are setting pricing or discounts for a product type. A list of product types can be found in Menu 12.3.25. Then enter the product type you are setting up.
G – Enter ‘G’ if you are setting pricing or discounts for a product category. A list of product categories can be found in Menu 12.3.34. Then enter the product category you are setting up
DPOINT - Points to a bucket: CPOINT - Points to a cost:
0 = Each Price 0 = Each Price
01 = First bucket -1 = Branch Cost
02 = Second bucket etc... -2 = Average Cost
06 = Last bucket -3 = Direct Cost
ABC – This is for future development hit <enter> and it will default to all
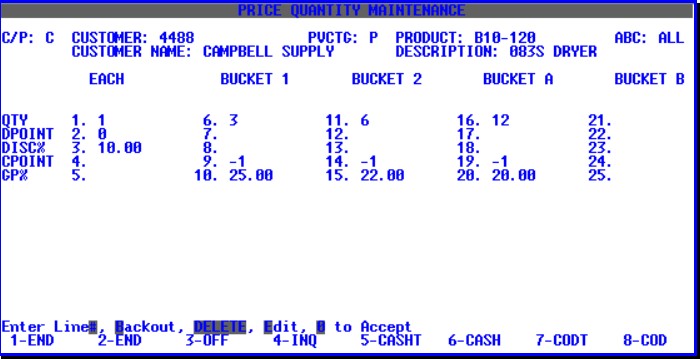
Scenario: You want a customer to get a bucket price for his each price and the product is already setup in 5.33 using the "all" customers feature. You cannot use the DPOINT to achieve this. Here is what you do:
1) Look at your "all" customers for that product.
2) Take the bucket 1 info from "ALL" and input into the each column for your specific customer
3) Take the bucket 2 info from "ALL" and input into the bucket 1 column for your specific customer
4) Take the bucket A info from "ALL" and input into the bucket 2 column for your specific customer
5) Take the bucket B info from "ALL"and input into the bucket A column for your specific customer
Menu 6 Inventory Evaluation
Menu 6.20 Possible Corp Returns
Corp now allows return goods for up to 60 days. The purpose of this report is to assist in identifying items that may be returnable.
The program prompts for the following:
Enter warehouse (3n)
Enter Last Receipt Date (mm/dd/yy) - this date should be no more than 60 days from the date you are running the report, 45 days is recommended to allow yourself time to process the return request.
Enter ABCDE Ranking (separated by ;) - you may select any or all product rankings to include in the report.
On Hand Selection:
1. On Hand greater than ROP
2. On Hand greater than 2 times ROP
3. On Hand greater than 3 times ROP
Enter 1, 2 or 3
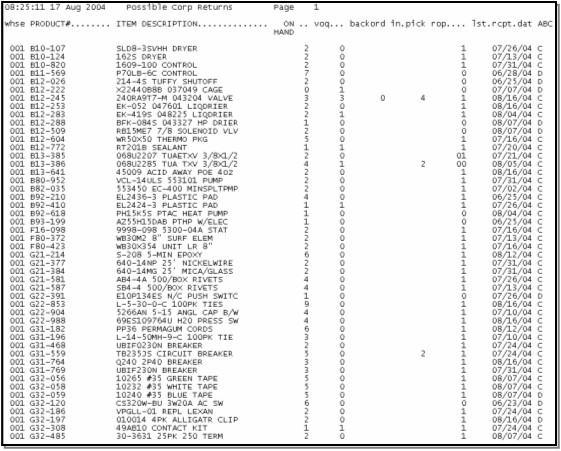
The report lists the following information (See example of report below):
- Warehouse
- Product#
- Item Description
- On Hand Qty
- Vendor On Order Qty
- Backordered Qty
- In Pick Qty
- ROP
- Last Receipt Date
- ABC Rank.ABC
Menu 7 Purchasing
Menu 7.25 - Reprint receipts report - by date
This is the same report that prints with day end, but is now made available to print for any date off of the menu. The only prompts are for the date and the company number. You may only do one date and one company at a time.
Menu 9 Physical Inventory Procedures
Menu 9.20 - Bar Coding Physical Inventory
Click here for complete documentation (Adobe Acrobat .pdf file)
Menu 11 Sales Analysis
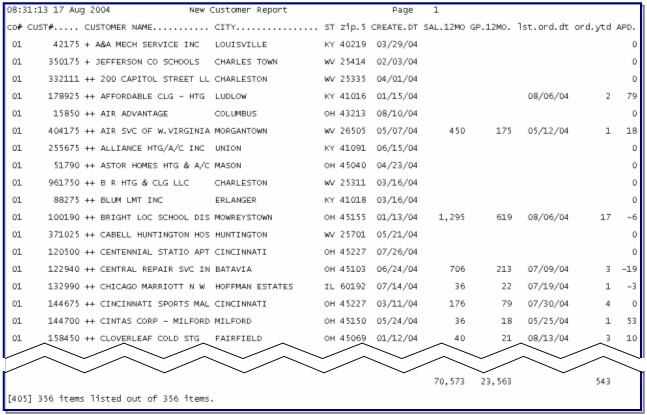
Menu 11.2.11- New Customer Report
This report is for you to use to monitor and analyze new customer ordering and receivables activity.
The program prompts for the following:
Enter Company (2N) or <enter> for all
Enter Beginning Create Date (mm/dd/yy)
Enter Ending Create Date (mm/dd/yy)
The report lists the following information (See example of report below):
- Company#
- Customer #
- Customer Name
- City
- State
- Zip
- Create date
- Sales Last 12 Months
- GP Last 12 Months
- Last order date
- No. of Orders YTD
- Average Pay Days
Menu 11.2.12 Weekly Sales Analysis
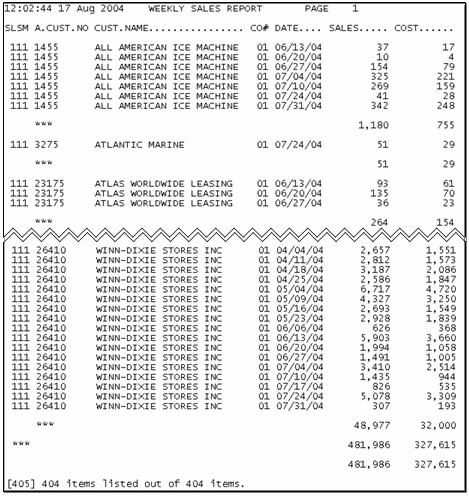
This report is intended to show the sales by salesman, by customer per week as opposed to seeing it only once a month.
This program prompts for the following information:
Enter a beginning date
Enter an Ending date
Enter Company (2N) or <Enter> for all
Enter Salesman (3N) (separate by ;) or <Enter> for all
Enter Customer Number or <Enter> for all
The report will list the following information (See example of report below):
- Salesman number
- Customer Number
- Customer Name
- Company #
- Week-Ending date
- Sales $
- Cost $
Menu 12 File Maintenance
Menu 12.2.2.2 Customer Master Maintenance
screen 2
New customer type 'NA' (National Account)
Corp. is giving more and more national accounts the same pricing structure that has been given to Johnson Controls. This new Customer Type has been setup with that same pricing structure without all of the other coding for Johnson Controls, for use with other national accounts (Like Siemens.) You will most likely need to setup this customer type on your system. Once it is setup, it will have special coding automatically when assigned to an account.
This pricing structure is as follows:
- 10% discount off Johnstone's transmitted regular price for all catalog products.
- 35% mark-up on all special ordered products.
Menu 12.2.41 Tax Exempt Expirations
This report is intended for you to be proactive in identifying the customers whose tax certificates on file are about to expire, or do not have a tax certificate on-file, yet are coded as non-taxable or tax exempt.
The program prompts for the following:
Enter Beginning Expiration Period (YYMM)
Enter Ending Expiration Period (YYMM)
Menu 12.4.1.8 Vendor Labels
This new program allows you to print labels for vendors similar to the labels for customers.
You can choose to print them 1 across or 3 across to accommodate the style of labels you are using. It will print a label for every single vendor in your system, including Corp. vendors with the exception of 'C' class vendors, which have no address in the file. The following information will be printed on the label:
Vendor Name
Address
City, State Zip
Menu 12.10 Port Control
This new feature is to prevent the "too many users" problem due to ports being left logged on when not really in use.
The new field #8 - Timeout on this port has been added to the port control (m. 12.10) screen.
The options for this field are:
Y = will automatically ''time out'' and go to the big J after about 15 minutes of inactivity.
N = Will NOT AUTOMATICALLY ''time out'' and go to the big J.
By default they are all N, blank = N. If you should happen to go to this field and you do not want it to auto-logoff, then just put N and it will not change the way it works currently.
Menu 13 Accounts Payable
Menu 13.20.33 - Download & Rebuild Corp Invoices
This new program will allow you to retrieve Corp. invoices that you did not receive and are not available to print using Menu 13.20.12, even after you've run 13.20.13. You will no longer have to call Corp. to make these invoices available to you.
When you run 13.20.33 it will ask you for the invoice date in MMDD format (for example, August 1st would be 0801.) Then it will prompt you for the branch number, this not the Company number (01, 02 etc...) it is your Corp. Branch # (123, 213 etc...)
Next, it will connect with the corp. server to find your invoices for that date for that branch and it will make them available for reprinting in menu 13.20.12 automatically.
This program will also work for missing packing lists.
Menu 19 Inquiries
Menu 19.6 Stock Status
SharePoint is now available from Stock Status*. Here's how it works: Go to Menu 19.6, Stock Status and enter a part number. Type in 'SP' (without the quotes) and press <enter>
The following options will be on the screen:
Product# : B10-120
Vendor# : 480
Enter Bulletin class (1-18):
1. Advertising/Flyer/Catalog Bulletin 16. Vendor Change Bulletin
2. A/O Vendor Information Sheets 17. Warranty Pages
3. C99 18. All Docs
4. Corporate Directories
5. Correspondence
6. Distribution Center
7. General Information Bulletin
8. Instant Flyers
9. Material Safety Data Sheets
10. New Product Bulletin
11. Price Change Bulletin
12. Price Savings Bulletin
13. Pricer
14. Regional Bulletin
15. Training Document
Select the number that corresponds to the document type you are looking for. It will automatically bring up SharePoint and prompt you for your login. If your login information is saved, you can just hit <enter> to log in, otherwise you will need to type in your user name and password. It will automatically perform the search based on the document type (a.k.a. bulletin class) you selected and either the part number or the vendor number, whichever is more appropriate for the document type you are searching for, and display the results on the screen. You can then click on the result that most closely matches what you are looking for.
*AccuTerm 2k2 is required to use this feature
New 'HOT KEYS" for use in Stock Status
Hotkey/Shortcut -DST takes you to http://dst.sitemax.com Use this any time you want to get to the DST site for upgrade documentation, project updates and to keep current with current DST info and developments
Hotkey/Shortcut -DOC takes you to http://dstdocs.sitemax.com Use this any time you want to get to the DST Documentation site for detailed menu path and processing documentation.
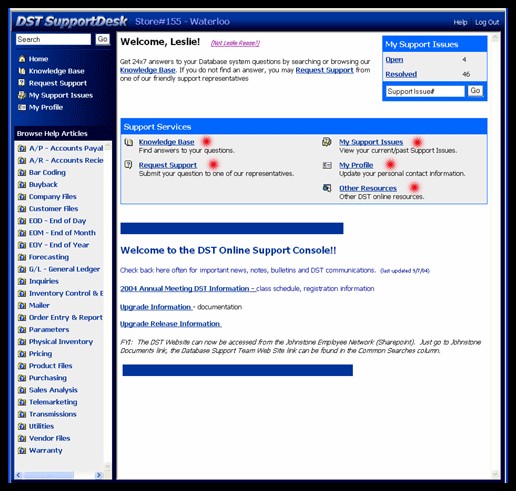
Hotkey/Shortcut -JOB Takes you to http://www.myjohnstone.com/dst where you can log your support jobs, update existing jobs, search the knowledgebase as well. For in-depth documentation CLICK HERE.
Menu 34 Bar Coding Menu
Menu 34.20 - Create Bar Code Receiver from Ship Date
When creating a bar code receiver from the corp. ship date, there is a new prompt to exclude daily emergency orders. If you select 'Y', it will not include daily emergency PO's in the receiver that is created. If you select 'N', it will include the daily emergency PO's in the receiver. You may want to exclude these orders because they are usually shipped completely separate from the Weekly corp. order.
Menu 35 Parameter Menu
Menu 35.12 - Signature Capture Company Parameters
New field for the Signature Capture Bypass Password. This is the password that can be used in Order Entry when 'B'ypassing the need for a signature. The password has been hard coded up until this point, but it is now user-controlled by menu 35.12 field 20. It is recommended to use menu 12.1.14 to password protect menu 35.12 to protect this bypass password. |


